tl;dr
- native.c:
- Reverse engineering matrix operations performed.
- tallocator.c:
- Exploiting an arbitrary free to corrupt heap metadata.
- Reverse shellcode to execute an ORW.
Challenge Points: 995
Solves: 4
Challenge Author:
- tourpran: Memory Allocator Exploitation, tallocator.c
- the.m3chanic: Reverse Engineering, native.c
- k0m1: General Android Dev

Challenge Description:
Built our enhanced memory allocator, designed specifically for admins and prioritizing both speed and security. Experience the boost in performance firsthand with our website speed tester.
Challenge File:
General:
First time, creating an android X pwn challenge, it was pretty fun and straight forward to solve. This challenge was inspired from google CTF: TRIDROID. If you are new to this, I heavily recomend going through that first. We will go in this specific order to solve the challenge.
- Debugging with gdbserver
- Reversing the native.c
- Exploiting the tallocator.c
- Writing Reverse Shellcode
- Packing the Exploit
Introduction: The App:
- Lets start analyzing the application from
AndroidManifest.xmlby throwing our application into JADX. - The application has a very simple working with just one activity
MainActivityand also has Internet Permission.
Looking into
MainActivity.java
1 |
|
We Could see that this activity has a Webview loading
example.net. We can load a custom url using the Dynamic Broadcast Receiver which takes an extraurl.We could notice that a library named
tallocatoris being loaded and it provides 2 native functions -tallocandtree.1
2public native long talloc(int i, byte[] bArr);
public native int tree(long j);Along with that, this webview provides a
JavascriptInterface, whose methods can be accessed viabi0sctfinstance.1
2
3
4
5
6
7
8
9
10
11
12
13
14
15
public long secure_talloc(String str, int i, byte[] bArr) {
if (new a().check(str)) {
return talloc(i, bArr);
}
return -1L;
}
public int secure_tree(String str, long j) {
if (new a().check(str)) {
return tree(j);
}
return -1;
}There are 2 functions that has
@JavascriptInterfacenotation -secure_tallocandsecure_tree, which internally accesses the native functions talloc and tree if we bypass thecheckmethod of classa.
Looking at class
a:
1 | public class a { |
- It has just one method
checkthat is being implemented in a JNI Library namednative, Which will be covered in the upcoming sections.
Debugging with gdberver:
Create the android image with the same specifications as given in the script.py (with AVDManager).
1
2
3
4
5
6
7
8
9
10subprocess.call(
"avdmanager" +
" create avd" +
" --name 'Pixel_4_XL'" +
" --abi 'default/x86_64'" +
" --package 'system-images;android-30;default;x86_64'" +
" --device pixel_4_xl" +
" --force" +
" > /dev/null 2> /dev/null",
env=ENV,close_fds=True,shell=True)Install the apk into the emulator and run the app. Meanwhile in
adbget the pid of the app and attach gdbserver to that pid with port forwarding enabled.In our machine we just connect gdb to that port using:
1
2
3$ adb forward tcp:7777 tcp:port
$ gdb
$ target remote 127.0.0.1:portMore information on how to work with gdbserver and inpecting memory is given here.
Reversing the native.c:
The working of the.m3chanic’s part of the challenge is pretty straightforward.
Let us start by looking at where our input is involved in this
- First, a floating point array of 4x4 is being initialised, and being passed to a function
v4
1 | void func_1(float a1[4][4]) |
- This function is simple, it’s just taking 16 characters as input and storing them as a 2d floating point matrix
- Next up it’s initialising another 4x4 floating point array, and passing it to another function
func_7 is as follows
1 | void func_7(float a1[x][x], float a2[x][x]) |
- This function is just copying the matrix to
a2, so nowv2contains our input
Next,
1 | float func_2(int a1, int a2, float a3[a1][a2]) |
- This function is called with arguments (4, 4, input_arr)
- It is declaring another floating point array
v2(local to this function), of 1 square dimension lesser than our input matrix
Let’s break down this
forloop:
1 | for (int j = 1; j < a1; j++) { |
- Currently, we know that
v2forms some kind of submatrix of the original matrix that we pass in, and that checks out seeing how it is being populated inside this for loop - A float
v1is being initialised to 0 as well.1
2int v3 = (i % 2 == 0) ? 1 : -1;
v1 += v3 * a3[0][i] * func_2(a1 - 1, a2 - 1, v2); - Then, based on the index value of i (as in, whether or not it is divisible by 2), it is set to either 1 or -1
And it is multiplied with the current column value of a3 and then multiplied with the return value offunc_2but with a smaller sub-matrix
If you see through this abstraction a little bit, and try and look at it as an implementation of something already existing, you will quickly realised that func_2 is just calculating the determinant of whatever matrix you pass to it
(Some things that give this away are the fact that submatrix is passed on recursively, and -1 is multiplied with the final return value based on the current index, which is the case for determinant also)
Next up, a new 4x4 matrix is being initialised and being passed to a function along with our input matrix
1 | void func_3(int a1, float a2[a1][a1], float a3[a1][a1]) |
Similar to the previous function, another submatrix is being initialised inside the function and is being populated - again, based on the indices
This one seems straightforward now that we’ve understood the previous function
It is simply calculating the minor matrix of the matrix passed as argument to it, and is finding the determinant of that matrix. This is the same as finding the cofactor of the given matrix (again, looking at it literally might not make sense at first, but once you try and think of it as an implementation of something else, the dots will start connecting).
Next function
1 | void func_4(int a1, int a2, float a3[a1][a2], float a4[a2][a1]) |
This one is simple, it just transposes the matrix you give it as input
Now, I think you can start seeing the full picture as wellFirst, we found the determinant of the matrix, next we found the cofactor matrix and transposed it (Keep in mind, transpose of the cofactor matrix is the same as finding the adjoint of a given matrix)
Next up, it’s taking the adjoint of the matrix we input, and dividing it with the determinant we found of it earlier
1
2
3
4
5
6
7
8
9
10
11void inverse_matrix(int N, float matrix[N][N], float inverse[N][N], int det, float cofactor[N][N])
{
for (int i = 0; i < N; i++)
{
for (int j = 0; j < N; j++)
{
inverse[i][j] = (float) (cofactor[j][i] / det);
}
}
}This is the same formula as finding the inverse of a given matrix ;)
And finally, the inverse of our matrix is being compared with a precalculated inverse
By property, (A⁻¹)⁻¹ == A itself, so all we need to do is find the inverse of the precalculated matrix
Finding that, and rounding off the numbers appropriately and converting them to their ascii characters will give us this as the valid input: 50133tbd5mrt1769
And now we can proceed to the rest of the challenge! :)
Exploiting the tallocator.c:
It is pretty straight forward to reverse engineer the talloc/tree functions that act similar to the malloc/free. So, I will be using my source code to explain things more clearly. Lets start off with a quick code run through…
Essentials:
1 | int init_talloc(){ |
- In
init_talloc, we can see that therunDebugis set to a mmapped region with RWX permisions, which has an addres of0x41410000. - Rest, initializes the Heapstart and topchunk to their appropriate values after an sbrk syscall.
talloc:
1 | Debugger_talloc = *(long long *)(HeapStart+40); |
- Quickly checks if the
Debugger_tallocis set to NULL, otherwise it jumps to whatever it is pointing to.
1 | if(alloc_size <= 0x150 && (ull *)HEAD_SHORT != 0){ |
- Pretty Simple, straight forward use of getting a free chunk.
- Get the
HEAD_SHORTfrom the top of the created heap, iterate through the entire linked_list and keep storing your best fit size and a pointer to that chunk. - Finally unlink that particular chunk from the linked list.
- Get the
- The same process is done if the request for the chunk was above the range 0x150, instead updating from the
HEAD_LONG. - If no chunk is present in the linked list, it just takes space from the top_chunk.
- note:
HEAD_LONGandHEAD_SHORTare both stored on top of our entire heap.
tree:
1 | if(chunk_size <= 0x100){ |
- Essentially, adds it back to the linked list, pointed by
HEAD_SHORTandHEAD_LONG.
other:
1 |
- Every chunk is 16 bytes aligned, hence I made it so that the last bit in the size_field as either:
- 1: currently in use
- 0: free to use
Helper Functions:
1 | function p64(data){ |
- Helps converting the 8 byte data stream in little endian to write specific address into memory.
Bug:
- We are able to free arbitrary pointers eventough it has some basic restrictions. Hence, Forging a fake chunk and using that to access the free list pointers on top of the heap.
- Manipulating the free_list pointers will get us to arbitrary write and hence writing out shellcode into the RWX region. This was the main aim of the challenge.
Writing Reverse Shellcode:
- Create a socket.
- Establish a connection to the ip, port that you have a listening port open on.
- Finally do Open, Read, Write, to the opened socket to print out the flag.
1 | global _start |
Exploit Script with comments:
Receiveing the Flag on the listening port:

Quick Mind Map:
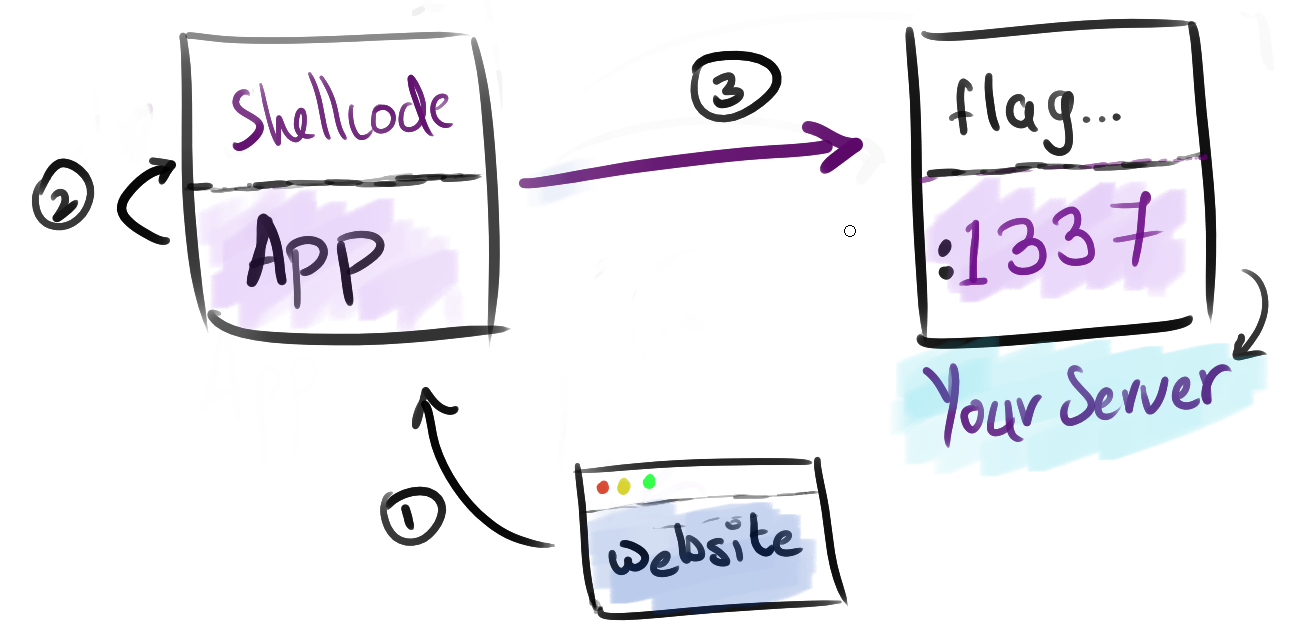
- The Final exploit to exploit can be found here
Closing Note:
Congrats to The Flat Network Society for first blooding the challenge. Hope you guys had fun solving the challenge!